 3DP Hub
Bed Fans Upgrade Guide
Published
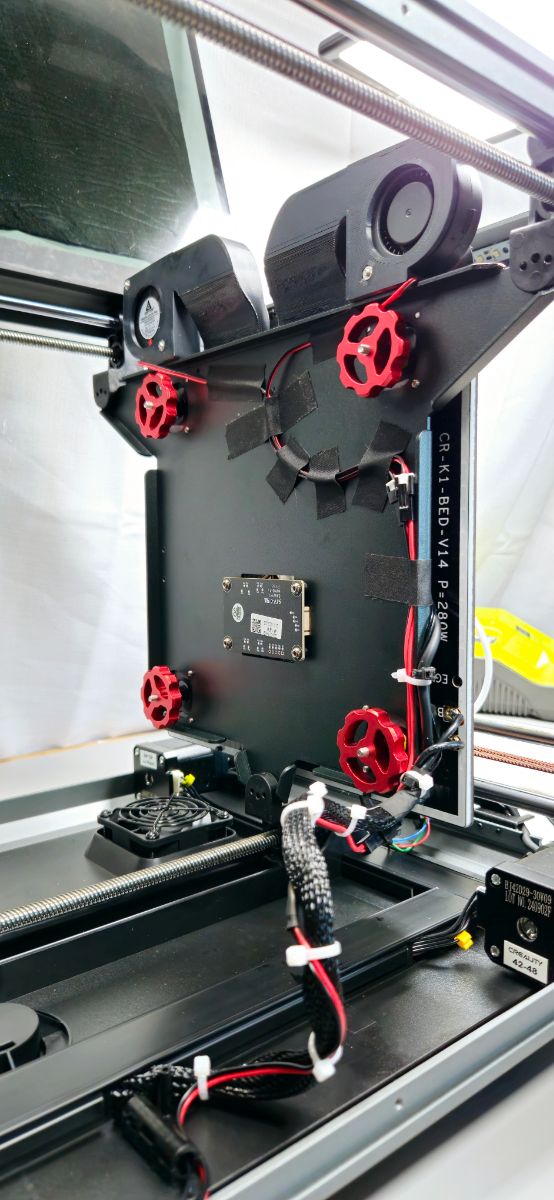
WORK IN PROGRESS. These fans take the heat that naturally builds up under the heated bed and circulate it through the print chamber. The result is a warmer, more stable environment that makes high-temperature filaments much easier to print without warping.

Search
Compatibility notes
Fan Mounts need 8mm of clearance between the bed frame and the bed heater. This only matters for aftermarket beds.
There is very little clearance between the fan housings and the door. This means if you have insulation or a printable door gap seal, you may lose some z build volume. If you need maximum build volume, consider lower profile housings like the BCJ Minimal.
Not compatible with the front beauty cover of the bed. This needs to be removed to allow airflow. It's useless, don't worry.
Bill of materials
| Qty | Item | Links | |
|---|---|---|---|
| 2 | 2-Pin 5015 24v Radial Fans | ||
| 4 | M3x20mm Screws | ||
| 4 | M3x12mm Screws | ||
| 4 | M3 Hex Nuts | ||
| 1 | 22-24AWG wire | ||
| 1 | TESA Tape | ||
| 1 | Zip Ties |
| Qty | Item | Links | |
|---|---|---|---|
| 1 | Male 2.54mm JST-XH connector | ||
| 1 | 2 pin JST-XH Splicer | ||
| 1 | XH2.54 Y-Splitter Cable |
Configuration guidelines
This project may require you to make changes to the printer.cfg file (located at /usr/data/printer_data/config/), copy and paste commands via a SSH utility like MobaXterm or RoyalTS, or run macros or commands through a Klipper interface such as Fluidd or Mainsail. On a Creality K1 Series printer, this requires root access. Read the links below for more information.
Tools required
Electrical safety
Printed parts
1. Introduction
This guide is a work in progress just to get you started and will be refined over time. Also shot a video in March which will be edited soon after the root access video. Refer to the bed leveling knobs guide for the hardware install - they mount to the load cells under the bed. You may need to use longer screws.
Printing materials like ABS, ASA, PA and PC on the Creality K1 Series can be frustrating because they often warp due to cooling rapidly. When this happens, you lose dimensional accuracy, quality, and there is a high chance of print failure from it detaching from the bed or curling upward and being shifted around by the nozzle. A simple upgrade that helps is adding D3D bed fans. These fans take the heat that naturally builds up under the heated bed and circulate it through the print chamber. The result is a warmer, more stable environment that makes high-temperature filaments much easier to print without warping.
2. Bed Fan Assembly
Install the fans into the housings
3. Lift up the bed
The mounting points for the bed fans are underneath the bed. You need to lift it up to gain access. This is a good time to install bed level knobs.
Remove the build plate
Remove the 4 screws securing the bed to the frame
Carefully stand the bed up, making sure not to put any stress on the wires
4. Mount the bed fans
Remove the front beauty cover from the bed
Remove the two front screws on each load cell
Secure the bed fan assembly to the load cells using longer screws
5. Splice The Wires
Either splice the cables together to make a 2 to 1 cable or plug them into the splicer PCB which needs to be installed onto the bed MCU.
6. Connection Option 1 (Not Recommended)
The easiest method is to unplug the side fan and use that port when needed. This is less flexible due to pre-existing auxiliary fan code which could override control, and not ideal for PLA printing, but doesn’t require you to modify your configuration file (does not require root access).
Follow the wire connected to the auxiliary (side) fan and disconnect it
7. Connection Option 2 (Recommended)
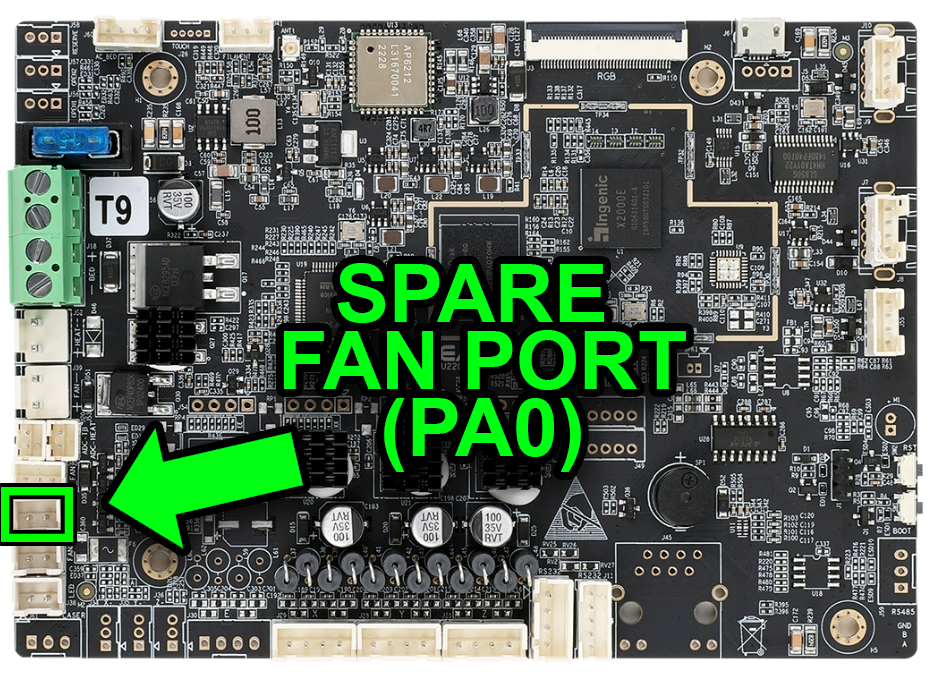
The best method is to connect to the spare PA0 pin on the mainboard. It gives you complete independent control and allows you to automate the fans while retaining the auxiliary fan functionality.
Open up the bottom of the printer
Connect to the spare port on the mainboard. This is called PA0 in the config.
8. Configuration File Changes
Copy and paste this to printer.cfg (located in usr/data/printer_data/config)
[output_pin bed_fans]
pin: PA0
pwm: True
cycle_time: 0.0100
hardware_pwm: false
value: 0.00
scale: 255
shutdown_value: 0.09. How To Use Bed Fans
10. Slicer Setup
The maximum value is 255. In this example, 128 is used to set the fans to half speed. This should provide enough airflow to improve the chamber heating without being too loud or causing cold spots on the bed. Feel free to tweak this value.
Optional: If you ONLY print high temperature filaments, add this to your machine start gcode in the slicer if you want the fans to run with ALL filaments:
SET_PIN PIN=bed_fans VALUE=128 To make the bed fans turn on only when a high temperature print starts (ABS, ASA, PA, PC) , add this to your filament start gcode in the slicer for each high temperature:
SET_PIN PIN=bed_fans VALUE=128 Optional: Add this to your machine end gcode in the slicer if you want the fans to turn off when the print ends, regardless of which filament profile you use:
SET_PIN PIN=bed_fans VALUE=011. Optional: Advanced Nozzle Wiper Integration
Set the variable to true in the nozzle wiper config:
config variable_bed_fans_installed : "TRUE"12. Optional: Fluidd Preheat Macro Setup
To set up a preheat macro which turns on the fans to prime the chamber for high temp filaments, open fluidd, click the cogwheel -> Thermal Presets -> ADD PRESET.
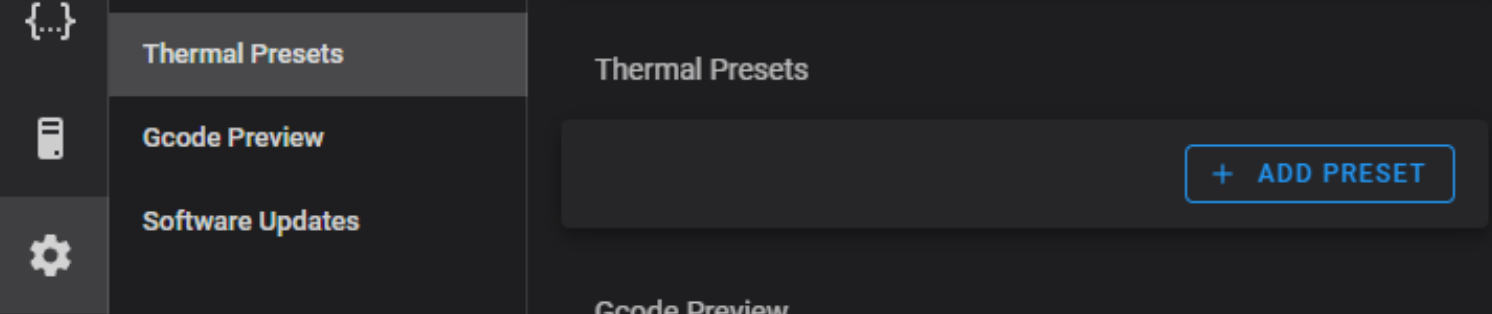
Give it a name (for example PREHEAT ASA)
Set the extruder temp to the value you would use in a filament dryer so it adds some heat but doesn’t soften the filament. (In this example, 60C is used for ABS/ASA)
Set the heater bed value to the bed temperature you use when printing (In this example, 105C is used for ABS/ASA)
You can use the chamber fan value to regulate the heat if the chamber starts getting too hot. (In this example, it is set to 55c to prevent the camera from overheating and shutting down.)
Copy and paste these lines into the GCode section:
G28 # HOMES THE PRINTER
SET_PIN PIN=bed_fans VALUE=128 # BED FANS
SET_PIN PIN=fan0 VALUE=128 # TOOLHEAD FAN
SET_PIN PIN=fan1 VALUE=0 # REAR FAN
SET_PIN PIN=fan2 VALUE=128 # SIDE FAN13. Learning Excercise
Tweak the example above to create your own thermal presets. Here are some ideas to try:
FULL BLAST
SLOW COOLING
PREHEAT PLA
14. Finished Image